2021년 10월 31일 일요일

Labelme 라벨 Crop과 회전 Augmentation

 졸업작품의 데이터셋이 너무 작아 Augmentation을 주어 크기를 키워 훈련 효율을 늘려야 하는 상황에 봉착했다. 또한 나무처럼 정확하게 구간을 정하기 힘든 라벨들이 회귀에 어려움을 주고 있었다.

 우리 프로젝트는 도로 인식이 주 목표이기 때문에 데이터 이미지의 하단부분만 잘라내어 사용하기로 계획을 변경했다. 또한 Augmentation으로 데이터셋을 확장하기 위해 잘라낸 부분을 다시 여러 각도로 돌렸다.

Labelme의 어떤 이미지 파일에 대한 Label JSON 구조는 다음과 같다.

{
  "version": "4.5.9",
  "flags": {},
  "shapes": [
    {
      "label": "_background_",
      "points": [
        [
          200,
          315
        ],
        [
          200,
          400
        ],
        [
          639,
          400
        ],
        [
          639,
          315
        ]
      ],
      "group_id": null,
      "shape_type": "polygon",
      "flags": {}
    }, ...],
  "imagePath": "1_taken-00720.jpg",
  "imageData": "BLOB 데이터",
  "imageHeight": 480,
  "imageWidth": 640
 }
 이미지를 잘라내면서 없어지는 Label들에 대한 처리, 잘라낸 후 남아있는 지점들에 대해 새 이미지 크기에 따라 변하는 Point의 좌표들을 수정해야한다. 우리가 필요로한 부분은 shapes 아래의 labelpoints들이다. Label의 이름은 label로, 그 Label의 각 점은 points에 X, Y 값으로 보관된다. 여기서 유의할 은 Points 들의 시작이 이미지의 좌측 상단부터 시작한다는 점이다.
def crop_process_labelme(path: str, x1: float, y1: float, x2: float, y2: float):
    '''
    path - Directory that contains labelme JSONs
    x1 - the cropping point of left top width from image
    y1 - the cropping point of left top height from image
    x2 - the cropping point of bottom right width from image
    y2 - the cropping point of bottom right height from image
    '''
    
    processed_dir = os.path.join(path, 'processed')
    paths = glob(os.path.join(path, '*.json'))

    if not os.path.exists(processed_dir):
        os.mkdir(processed_dir)

    for path in paths:
        with open(path, 'r') as f:
            print('Processing : ', os.path.basename(path))
            tmp = json.load(f)
            i = 0

            while True:
                try:
                    shape = tmp['shapes'][i]
                    min_x = tmp['imageWidth'] + 1
                    max_x = -1
                    min_y = tmp['imageHeight'] + 1
                    max_y = -1

                    points = shape['points']
                    for point in points:
                        min_x = min(point[0], min_x)
                        max_x = max(point[0], max_x)
                        min_y = min(point[1], min_y)
                        max_y = max(point[1], max_y)

                    left = (x1 - max_x) > 0
                    right = (x2 - min_x) > 0
                    top = (y1 - max_y) > 0
                    bottom = (y2 - min_y) > 0

                    if top and bottom or left and right:
                        # if every points of a shape is out of cutting range,
                        # then it will not appear in a cropped picture. we don't need this.

                        print(tmp['shapes'][i]['label'], max_x, min_x, max_y, min_y)
                        del tmp['shapes'][i]
                    else:
                        print('Cliping : ', i)
                        for point in points:
                            # Clipping points
                            if int(point[0]) >= x2:
                                point[0] = x2
                            if int(point[1]) >= y2:
                                point[1] = y2
                            if int(point[0]) <= x1:
                                point[0] = x1
                            if int(point[1]) <= y1:
                                point[1] = y1
                        i += 1
                except IndexError:
                    break
        with open(os.path.join(processed_dir, os.path.basename(path)), 'w') as f:
            json.dump(tmp, f, indent=2)
 x1, y1, x2, y2는 잘라낼 구간의 좌표 변수이다. shape의 모든 X, Y points의 최대, 최소 값을 구한다. shape의 x, y 최대/최소값이 x1, y1, x2, y2 (잘라낼 구간)에 들어오지 않는다면 해당 shape을 삭제한다. 남은 shapepoints들은 자르고자 하는 범위 내 값으로 Clipping한다.
 Labelme가 제공하는 VOC 데이터셋 생성하는 스크립트는 JSON 안에 있는 이미지 메타데이터(imageData, imageHeight, imageWidth)를 이용하여 Label을 생성한다. 그래서 다음과 같이 원래 이미지의 해상도에서, 자른 구간만이 포함된 label 이미지가 생성된다.
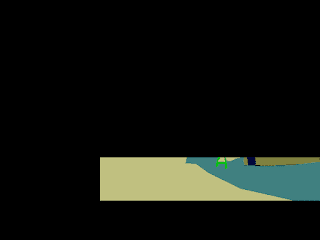
새롭게 나온 Label
 이제 Pillow를 사용해 필요한 부분만을 가져온다. 
def crop_image_voc(path: str, x1: float, y1: float, x2: float, y2: float):
    '''
    path - VOC Dataset root dir that generated by labelme2voc
    x1 - the point of left top width from image
    y1 - the point of left top height from image
    x2 - the point of bottom right width from image
    y2 - the point of bottom right height from image
    '''
    processed_dir = os.path.join(path, 'processed')
    filenames = glob(os.path.join(path, 'SegmentationClassPNG', '*.png'))
    filenames.extend(glob(os.path.join(path, 'JPEGImages', '*.jpg')))
    img = None

    if not os.path.exists(processed_dir):
        os.mkdir(processed_dir)

    for filename in filenames:
        category = os.path.split(os.path.split(filename)[0])[-1]
        if not os.path.exists(os.path.join(processed_dir, category)):
            os.mkdir(os.path.join(processed_dir, category))

        img = Image.open(filename)
        img = img.crop((x1, y1, x2, y2))
        img.save(os.path.join(os.path.join(processed_dir, category), os.path.basename(filename)))
 잘라낸 이미지를 OpenCV로 회전시킨다.
def rotate_images_voc(path: str, angles: list):
    '''
    path - VOC Dataset root dir that generated by labelme2voc
    angles - degrees of image rotation
    '''
    def rotate_image_cv2(image, angle, flag):
        # https://stackoverflow.com/questions/9041681/opencv-python-rotate-image-by-x-degrees-around-specific-point
        
        image_center = tuple(np.array(image.shape[1::-1]) / 2)
        rot_mat = cv2.getRotationMatrix2D(image_center, angle, 1.0)
        result = cv2.warpAffine(image, rot_mat, image.shape[1::-1], flags=flag)
        return result
    
    label_root = os.path.join(path, 'SegmentationClassPNG')
    image_root = os.path.join(path, 'JPEGImages')

    label_processed_dir = os.path.join(label_root, 'processed')
    image_processed_dir = os.path.join(image_root, 'processed')

    if not os.path.exists(label_processed_dir):
    	os.mkdir(label_processed_dir)
    if not os.path.exists(image_processed_dir):
    	os.mkdir(image_processed_dir)

    labels = glob(os.path.join(label_root, '*.png'))
    images = glob(os.path.join(image_root, '*.jpg'))

    for path in labels:
        for a in angles:
            lbl = Image.open(path).convert("P")
            palette = lbl.getpalette()
            lbl = np.array(lbl)
            rotated_lbl = rotate_image_cv2(lbl, a, cv2.INTER_NEAREST)

            new_name = os.path.basename(path).split('.')
            new_name[0] = new_name[0] + '_' + str(a)
            new_name = '.'.join(new_name)

            rotated_lbl = Image.fromarray(rotated_lbl)
            rotated_lbl = rotated_lbl.convert("P")
            rotated_lbl.putpalette(palette)

            rotated_lbl.save(os.path.join(label_processed_dir, new_name))

    for path in images:
        for a in angles:
            img = cv2.imread(path)
            rotated_img = rotate_image_cv2(img, a, cv2.INTER_LINEAR)

            new_name = os.path.basename(path).split('.')
            new_name[0] = new_name[0] + '_' + str(a)
            new_name = '.'.join(new_name)

            cv2.imwrite(os.path.join(image_processed_dir, new_name), rotated_img)
 label_rootimage_root는 스크립트로 생성된 Label 이미지와, 원본 이미지의 위치다.  Palette 데이터가 손실되지 않도록 Interpolation을 Nearest로 선택한다. Label 데이터인 경우 회전 후 저장 시 Labelme에 의해 생성된 Palette 데이터를 복구한 후 저장한다. 
 혹여나 회전하면서 생기는 검은 뒷배경이 나오지 않도록, 회전 후 이미지의 중앙 부분만을 잘라서 저장하는 방법이 필요로 하다면 다음 링크를 참고하면 될 것 같다.

2021년 10월 29일 금요일

Unity MLAPI NetworkVariable 배열 만들기

여러개의 플레이어 ID를 받고 중복되지 않게 그들의 랜덤 팀과 위치를 서버 쪽에서 지정해주려고 NetworkVariable로 저장하려고 했다. Network 변수 타입들을 연속으로 지정하려는데 초기화 시 permission도 줘야해서 작은 클래스를 하나 만들어서 구현했다.
public class NetworkLists<T> : NetworkList<NetworkList<T>>
{
    public NetworkLists(NetworkVariableSettings permission, int length) : base(permission)
    {
        for(int i = 0; i > length; ++i) base.Add(new NetworkList<T>(permission));
    }
}

2021년 10월 27일 수요일

YAML + GStreamer로 Pipeline 만들기

 파이프라인 명령어를 parse_launch로 입력하거나 코드로 작성해 두는 방식들은 수정하기 불편하고, 에러가 눈에 쉽사리 들어오지 않아 시작 Pipeline을 yaml로 수정할 수 있도록 만들어 보았다. Pad 등의 기능은 추가하지 않았다. 비슷한 패턴을 이용하여 구현할 수 있을 것이다. 

YAML 파일은 다음과 같이 작성했다.

element:
  camerasrc:
    element: v4l2src

  srccap:
    element: CAPS
    property: 
        MIME: video/x-raw
        width: 640
        height: 480
        framerate: 30/1
        format: YUY2

  vidconv1:
    element: videoconvert

  vidcap:
    element: CAPS
    property:         
        MIME: video/x-raw
        width: 640
        height: 480
        format: BGRx

  vidconv2:
    element: videoconvert

  timestamp_queue1:
    element: queue
    property:
      leaky: downstream
      max-size-buffers: 1

  timestamp_text:
    element: textoverlay
    property:
      text: ''
      valignment: bottom
      halignment: left
      font-desc: Sans, 12

  timestamp_queue2:
    element: queue
    property:
      leaky: downstream
      max_size_buffers: 1

  app-file-tee:
    element: tee

  appsink_queue:
    element: queue
    property:
      leaky: downstream
      max-size-buffers: 1

  appsink:
    element: appsink
    property:
      max-buffers: 1

  videofilesink_queue:
    element: queue
    property:
      leaky: downstream
      max-size-buffers: 1

  h264encoder:
    element: omxh264enc

  h264cap:
    element: CAPS
    property: 
        MIME: video/x-h264
        stream-format: byte-stream

  h264parse:
    element: h264parse

  tomp4:
    element: mp4mux

  tovideofile:
    element: filesink
    property:
      sync: false
      location: ''

link:
  camerasrc: srccap
  srccap: vidconv1
  vidconv1: vidcap
  vidcap: vidconv2
  vidconv2: timestamp_queue1
  timestamp_queue1: timestamp_text
  timestamp_text: timestamp_queue2
  timestamp_queue2: app-file-tee

  appsink_queue: appsink
  
  videofilesink_queue: h264encoder
  h264encoder: h264cap
  h264cap: h264parse
  h264parse: tomp4
  tomp4: tovideofile

  app-file-tee: [appsink_queue, videofilesink_queue]
 element가 될 요소들은 element 아래에 작성하고, 각 element의 name을 먼저 나오도록 했다. 각 element를 연결하기 위해 element의 이름을 받아 왼쪽에서 오른쪽으로 연결할 수 있게 했다. tee와 같이 여러개를 link하는 요소는 배열로 이름을 받았다.

 CapsFilter를 파싱할때 MIME이라는 예약어를 만들었다. 여기에 Capability의 MIME 종류가 들어간다. 그 외의 Capabilities는 다른 element와 마찬가지로 입력을 받는다.


YAML 파일을 불러들이고, 이를 나누는 함수는 다음과 같이 구현했다.

def set_launch_option(self, path):
    with open(path) as f:
        config = yaml.load(f, Loader=yaml.FullLoader)
        elements = config['element']
        links = config['link']
        super().set_pipe(elements, links)
def set_pipe(self, elements: dict, links: dict):
        add_list = {}
        try:
            for key in elements.keys():
                name = key
                element = elements[key]['element']
                
                if element == 'CAPS':
                    prpty = elements[key]['property']
                    cap_string = ''
                    args = [prpty['MIME'], ]

                    for prpty_key in prpty.keys():
                        args.append(prpty_key + '=' + str(prpty[prpty_key]))
                    cap_string = ", ".join(args)
                    caps = Gst.caps_from_string(cap_string)
                    tmp = Gst.ElementFactory.make("capsfilter", name)
                    tmp.set_property("caps", caps)
                else:
                    try:
                        prpty = elements[key]['property'].items()
                    except:
                        prpty = []
                    tmp = Gst.ElementFactory.make(element, name)
                    for p in prpty:
                        tmp.set_property(p[0], p[1])
                add_list.update({name : tmp})
            
            for key in add_list.keys():
                element = add_list[key]  
                self.pipe.add(element)

            for key in links.keys():
                frm = add_list[key]
                link = links[key]
                if type(link) == list:
                    for lnk in link:
                        frm.link(add_list[lnk])
                else:
                    to = add_list[link]
                    frm.link(to)
        except KeyError as e:
            errmessage = str(getattr(e, 'message', repr(e)))
            logging.error(GStreamerTag('Failed to create a pipeline : Config error', e))
        except Exception as e:
            errmessage = str(getattr(e, 'message', repr(e)))
            logging.error(GStreamerTag('Unknown Error : ', e))
 YAML의 element와 link의 값을 가져온다. 그리고 set_pipe 함수에서 ElementFactory와 link를 통해 Pipeline을 생성한다.

 element로 입력된 요소들을 받아, CAPS일 경우 CapsFilter로 만들어 element로 생성할 수 있도록 처리한다. MIME는 처음에 붙이고, 나머지는 리스트에 담은 후 ', '의 패턴으로 문자열 join하여 caps_from_string 함수에 넣어 Capabilities를 생성한다.

 그 외의 일반 element는 property가 없이 주어진 경우를 따로 구분하여 AttributeError를 피하고, 생성된 element들은 이후 link하기 위해 Dictionary로 저장한다.

 마지막으로 link에서 받은 element의 이름에 따라 각 element들을 연결한다. 여러개로 연결되어야 하는 경우, 배열로 값이 들어오기 때문에 type을 확인한 후 연결될 해당 element에 각각 link한다. 필요하다면 type을 list가 아니라 Iterable로 바꾸어 유연하게 사용할 수도 있을 것이다.

 element나, MIME같은 예약어가 없거나, link에서 알 수 없는 element의 이름이 들어온 경우 등은  KeyError로 Exception이 발생할 것이고, 그 외 어떤 element 생성에 사용할 수 없는 property가 들어온 경우 등의 에러는 마지막 Exception으로 게으르게 처리했다.

[번] Callback 지옥, Promises, 그리고 Async/Await

원문:  https://blog.avenuecode.com/callback-hell-promises-and-async/await  Callbacks와 promises, 그리고 async/await을 쓰는 비동기 자바스크립트는 반환하는데 시간이 소요되는...