2022년 1월 19일 수요일

[번] Callback 지옥, Promises, 그리고 Async/Await

원문: https://blog.avenuecode.com/callback-hell-promises-and-async/await

 Callbacks와 promises, 그리고 async/await을 쓰는 비동기 자바스크립트는 반환하는데 시간이 소요되는 함수에 도움이 된다. 이 글은 기본적으로 callbacks, promises, 그리고 async/await이 어떻게 작동하는지 그리고 읽을 수 없는 복잡한 callback을 이해하는데 도움을 줄 것이다.

Callbacks

Callback 함수는 주로 다른 함수의 매개변수로 사용된다. Callback 함수를 매개변수로 받는 함수는 보통 데이터베이스로부터 데이터를 받거나, 파일을 받거나, API 요청을 하거나, 작업 완료가 코드 Thread를 오랜 시간 Block할 수 있는 코드이다.

가령, 이미지를 받는다고 해보자. 이미지를 받는데 2초가 걸리는데, 다운로드가 진행되는 동안 코드 실행이 안 멈추길 원한다. Callback은 다른 함수들이 작동하면서 이미지 다운로드가 완료됐을 때 "알려 준다."

setTimeout 함수를 통해 이미지를 다운로드하는 상황을 가정해보자. (우측은 작동 로그이다.)


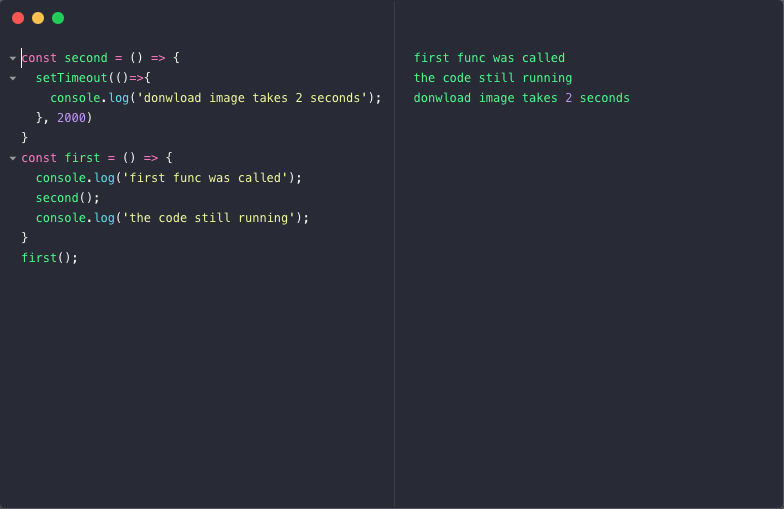
보는 바와 같이, setTimeout 함수가 있는 callback 함수에 의해 second() 함수는 2초 후에 작동한다. 다운로드가 진행되는 동안 first() 함수는 끊김없이 실행됐다. 

다시말해, callback 함수는:
  • 함수가 "Background"에서 실행될 수 있도록 하고,
  • 함수의 실행이 완료되면 실행이 되며,
  • 코드의 실행을 막지 않는다. (Non-blocking)

그러나, 엄청난 힘에는 엄청난 무책임이 따른다 :). 비동기 호출을 하는 몇몇 함수들은 다음과 같이 좋지않게 짜여질 수 있다.
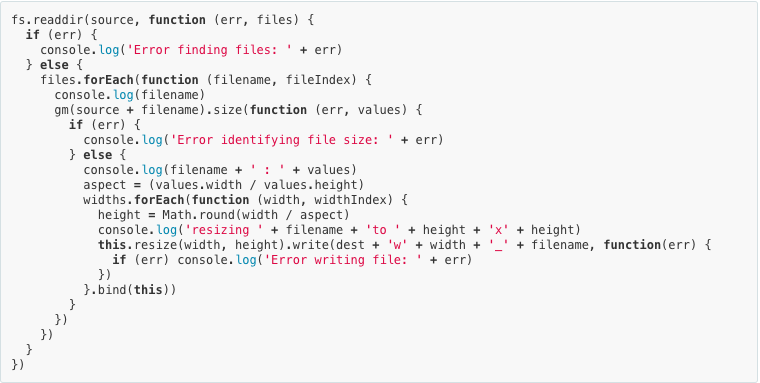
Callback 지옥

위의 코드는 이해하기도 어렵고, 관리하기도 어려우며 확장성도 낮다. 이걸 우리는 Callback 지옥이라 부른다. (심지어 이에 대한 자세한 설명이 있는 callbackhell라는 사이트도 있다.)

최신 Javascript에서는 이 고통을 끝내 줄 두개의 약속이 있다. 이들은 바로 promises와 async/await이다.

Promises

Promises는 차후에 사용이 가능할 무엇인가를 표현하는 Object이다. 프로그래밍에서 무엇이라고 하면 값을 의미한다. Promises는 원하는 값을 기다리는 것이 아닌, 받을 값을 표현하는 것을 즉시 받아 "해야할 일을 먼저 하고" 때가 되면 다시 돌아가서 promise에 의해 생성된 값을 사용하는 방식을 제안한다.

Promises는 시간 사건에 기반하며 이를 구분하는 몇몇개의 상태가 있다:
  • Pending (대기중): 이벤트가 발생하기 직전
  • Settled/Resolved (~진행중): 이벤트가 시작한 시점
  • Fulfilled (~성공): 정상적으로 promise가 값을 반환한 경우
  • Rejected (~실패): promise가 비정상적인 값을 반환한 경우

Promise를 생성했을 때, 새로운 promise를 생성하고 결과를 반환하는데 해당 promise를 사용한다. Promise를 사용할때는, 상태가 Fulfilled인지 Rejected인가에 따라 Callback 함수를 사용한다.


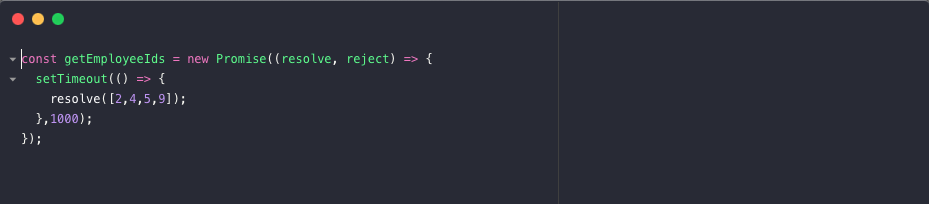
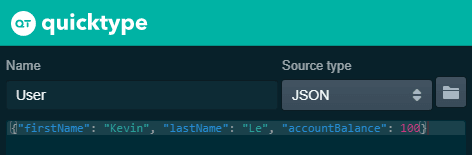
해당 예시에서, 직원들의 ID들을 찾는 promise를 생성하였다. promise Object는 두개의 callback 함수, resolvereject 함수를 받는다. 이 callback은 executor function이라 부르며, promise가 생성될 때 호출된다.

executor function는 이벤트가 성공했는지의 promise를 알려준다. 성공했다면 resolve가 호출이 되고, 실패했다면 reject 함수가 호출된다.

promise를 사용해보자. 이를 위해 then()과 catch() 두개의 함수를 사용할 것이다. 모든 promise는 이 두개의 함수를 상속받는다.


반한된 Object의 then()은 promise가 fulfilled 상태에 도달했을 때의 이벤트를 추가할 수 있도록 하며, 이는 성공 상태를 의미하고, 즉 resolve 함수를 executor function의 결과로 반환한다.

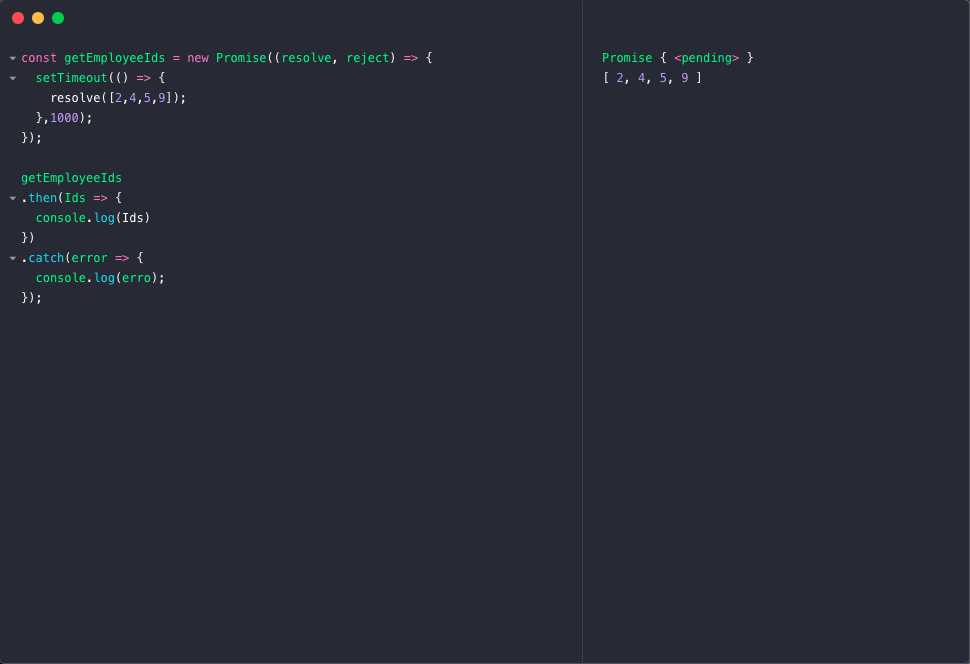
반환된 데이터를 처리하는 callback 함수를 주어야 한다. 이 callback 함수는 매개변수를 받는데--이 예시에서는 ID들이 된다. ID들 매개변수는 promise의 결과이며, 반환 결과는 callback 함수가 지정한 배열을 받게 된다.

catch 함수는 유사한 방식으로 작동하나, reject 함수를 위한 결과를 반환한다.

Callback 지옥을 해결하기 위한 promise의 기본 원리들은
  • 모든 promise는 callback들의 결과에 대한 제어권을 갖는다: resolve, reject 함수
  • 모든 promise Object들은 then(), catch() 함수를 가지고 있다.
Promise는 chaining이라는 좋은 이점을 가지고 있다. Chaining을 통해 새로운 then() 함수에 then()을 붙일 수 있다. 이는 성공한(resolved) promise들의 확실한 제어권을 준다.


하지만 마술사에게 마법이 돌아오지 않도록 조심해야하는데, promise callback 지옥이 생길 수 있다. user를 인증한다고 상상해보자. (단지 예시로써)

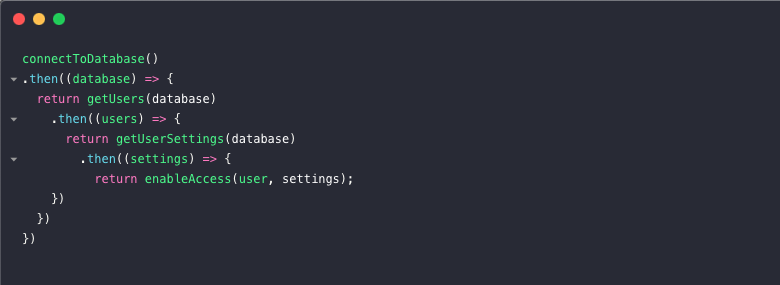
이 promise 사용에서 Callback 지옥의 패턴을 알아볼 수 있나? 하나의 호출에 다른 호출 그리고 더 많은 호출이 붙기 시작하면 이 코드는 가독성이 떨어지고 관리하기 어려워진다.

그래서 언제나 좋은 promise 구현들을 기억하고 있어야한다. 예를 들어, 몇몇 상황에서 모든 promise들을 한번에 해결할 수 있다:


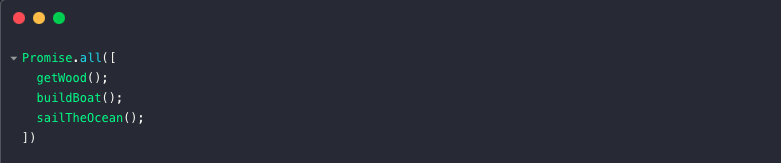
하지만 Promise.all()을 사용하는 건 promise의 순서에 상관이 없을때 사용한다. promise의 순서를 다음과 같이 지정해줄 수 있다:


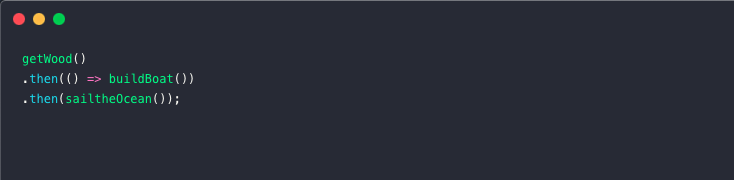
이 짧은 표기법은 then() 함수가 promise를 반환하기 때문에 작동한다. 여기에 따르기 좋은 관습에 대한 글이 있다.


Async/await

Async/await은 promise를 사용할 수 있는 대안으로, ES8이나 ES2017에 구현돼 있다. 


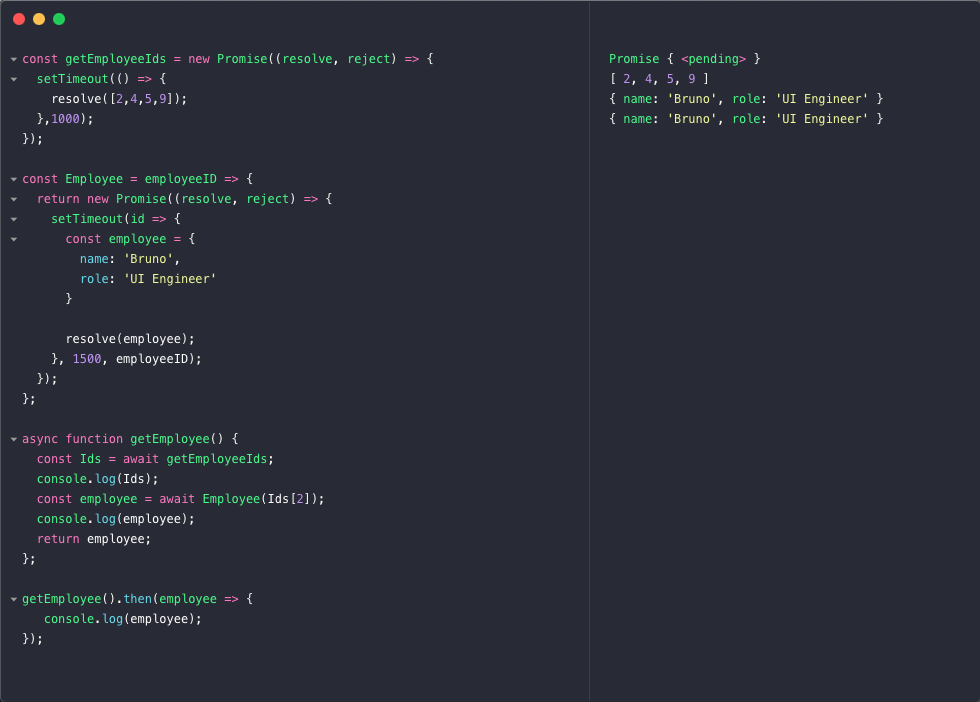
이 코드에서 다음과 같은 일이 일어나고 있다: async 함수를 async 키워드를 function 키워드 앞에 작성함으로 생성한다. 이 함수가 비동기, background에서 작동한다는 것이다.

그래서 async 함수에서는 무슨 일이 생기는가?

async 함수는 하나 또는 여러개의 await 표기들이 들어가며, promises들을 await이라는 표기를, promise의 resolved 함수의 결과를 반환하는, 통해 사용했다.

이는 간단히 말해 비동기 경우들을 background에서 Top-Down 방식으로 처리한다는 것이다.

기억해야 할 중요한 부분은, async 함수는 promise를 반환한다는 것이다. 그래서 getEmployee() 함수를 반환하므로 then() 함수를 사용해야 하고 그렇게 하여 예상한 결과를 반환한다.--그래서 promise의 개념과 어떻게 작동하는지를 잘 알아야 한다.

callback들과 promise들 그리고 async/await을 위한 튜토리얼은 이정도다. Let me know how it goes for you!

[번] JSON을 TypeScript 인터페이스로 Type-safely하게 Parse하기

원문 : https://dev.to/codeprototype/safely-parsing-json-to-a-typescript-interface-3lkj

 User라는 JSON 문자열을 반환하는 REST API를 이용한다고 가정해보자. JSON API는 문자열형의 firstNamelastName 그리고 number형인 accountBalance를 반환한다. User를 TypeScript를 사용해 아래와 같이 interface로 정의할 수 있다: 


interface User {

    firstName: string;

    lastName: string;

    accountBalance: number;

}


다음 코드는 JSON의 반환이 명시된 타입과 항상 일치한다고 하면 (happy path) 문제가 없다 :


const json = '{"firstName": "Kevin", "lastName": "Le", "accountBalance": 100}'

const user: User = JSON.parse(json)


하지만 API에서 에러가 발생할 수 있다. JSON 문자열이 다음과 같이 반환될 수 있다 :


const json  '{"firstName": "Kevin", "lastName": "Le", "accountBalance": "100"}'

const user: User = JSON.parse(json)

console.log(user)


accountBalance가 number가 아니라 any로 취급되나 에러가 발생하지 않는다. 그러나 이런 "너그러운" 조취는 다른 문제의 발생을 야기한다:


const balanceAfterInterest = user.accountBalance + user.accountBalance * 0.05

console.log(balanceAfterInterest) //1005


balanceAfterInterest 는 105가 되어야 한다. 더 나은 접근법은 이 문제를 catch하고 바로 적절하게 처리해주어야 한다.


https://app.quicktype.io에 접속하여 왼쪽 패널에 {"firstName": "Kevin", "lastName": "Le", "accountBalance": 100} 입력한다. 이름에 User를 입력하고, Source type으로 JSON 을 선택한다.

Alt Text

우측에서 LanguageTypeScript로 선택하고 Verify JSON.parse results at runtime이 설정돼있는지 확인한다. Quicktype은 생성된 코드와 사용방법을 중앙에 보여준다.

Alt Text

다음 코드는 안전하게 작동한다:
import { Convert, User } from "./user";

const json =
  '{"firstName": "Kevin", "lastName": "Le", "accountBalance": "100"}';

try {
  const user = Convert.toUser(json);
  console.log(user);
} catch (e) {
  console.log("Handle error", e);
}

예외가 발생하고 처리할 수 있다:


Quicktype이 생성한 코드는 다음과 같다 (user.js):
// To parse this data:

//

//   import { Convert, User } from "./file";

//

//   const user = Convert.toUser(json);

//

// These functions will throw an error if the JSON doesnt

// match the expected interface, even if the JSON is valid.


export interface User {

    firstName:      string;

    lastName:       string;

    accountBalance: number;

}


// Converts JSON strings to/from your types

// and asserts the results of JSON.parse at runtime

export class Convert {

    public static toUser(json: string): User {

        return cast(JSON.parse(json), r("User"));

    }


    public static userToJson(value: User): string {

        return JSON.stringify(uncast(value, r("User")), null, 2);

    }

}


function invalidValue(typ: any, val: any, key: any = ''): never {

    if (key) {

        throw Error(`Invalid value for key "${key}". Expected type ${JSON.stringify(typ)} but got ${JSON.stringify(val)}`);

    }

    throw Error(`Invalid value ${JSON.stringify(val)} for type ${JSON.stringify(typ)}`, );

}


function jsonToJSProps(typ: any): any {

    if (typ.jsonToJS === undefined) {

        const map: any = {};

        typ.props.forEach((p: any) => map[p.json] = { key: p.js, typ: p.typ });

        typ.jsonToJS = map;

    }

    return typ.jsonToJS;

}


function jsToJSONProps(typ: any): any {

    if (typ.jsToJSON === undefined) {

        const map: any = {};

        typ.props.forEach((p: any) => map[p.js] = { key: p.json, typ: p.typ });

        typ.jsToJSON = map;

    }

    return typ.jsToJSON;

}


function transform(val: any, typ: any, getProps: any, key: any = ''): any {

    function transformPrimitive(typ: string, val: any): any {

        if (typeof typ === typeof val) return val;

        return invalidValue(typ, val, key);

    }


    function transformUnion(typs: any[], val: any): any {

        // val must validate against one typ in typs

        const l = typs.length;

        for (let i = 0; i < l; i++) {

            const typ = typs[i];

            try {

                return transform(val, typ, getProps);

            } catch (_) {}

        }

        return invalidValue(typs, val);

    }


    function transformEnum(cases: string[], val: any): any {

        if (cases.indexOf(val) !== -1) return val;

        return invalidValue(cases, val);

    }


    function transformArray(typ: any, val: any): any {

        // val must be an array with no invalid elements

        if (!Array.isArray(val)) return invalidValue("array", val);

        return val.map(el => transform(el, typ, getProps));

    }


    function transformDate(val: any): any {

        if (val === null) {

            return null;

        }

        const d = new Date(val);

        if (isNaN(d.valueOf())) {

            return invalidValue("Date", val);

        }

        return d;

    }


    function transformObject(props: { [k: string]: any }, additional: any, val: any): any {

        if (val === null || typeof val !== "object" || Array.isArray(val)) {

            return invalidValue("object", val);

        }

        const result: any = {};

        Object.getOwnPropertyNames(props).forEach(key => {

            const prop = props[key];

            const v = Object.prototype.hasOwnProperty.call(val, key) ? val[key] : undefined;

            result[prop.key] = transform(v, prop.typ, getProps, prop.key);

        });

        Object.getOwnPropertyNames(val).forEach(key => {

            if (!Object.prototype.hasOwnProperty.call(props, key)) {

                result[key] = transform(val[key], additional, getProps, key);

            }

        });

        return result;

    }


    if (typ === "any") return val;

    if (typ === null) {

        if (val === null) return val;

        return invalidValue(typ, val);

    }

    if (typ === false) return invalidValue(typ, val);

    while (typeof typ === "object" && typ.ref !== undefined) {

        typ = typeMap[typ.ref];

    }

    if (Array.isArray(typ)) return transformEnum(typ, val);

    if (typeof typ === "object") {

        return typ.hasOwnProperty("unionMembers") ? transformUnion(typ.unionMembers, val)

            : typ.hasOwnProperty("arrayItems")    ? transformArray(typ.arrayItems, val)

            : typ.hasOwnProperty("props")         ? transformObject(getProps(typ), typ.additional, val)

            : invalidValue(typ, val);

    }

    // Numbers can be parsed by Date but shouldnt be.

    if (typ === Date && typeof val !== "number") return transformDate(val);

    return transformPrimitive(typ, val);

}


function cast(val: any, typ: any): T {

    return transform(val, typ, jsonToJSProps);

}


function uncast(val: T, typ: any): any {

    return transform(val, typ, jsToJSONProps);

}


function a(typ: any) {

    return { arrayItems: typ };

}


function u(...typs: any[]) {

    return { unionMembers: typs };

}


function o(props: any[], additional: any) {

    return { props, additional };

}


function m(additional: any) {

    return { props: [], additional };

}


function r(name: string) {

    return { ref: name };

}


const typeMap: any = {

    "User": o([

        { json: "firstName", js: "firstName", typ: "" },

        { json: "lastName", js: "lastName", typ: "" },

        { json: "accountBalance", js: "accountBalance", typ: 0 },

    ], false),


};

2021년 11월 23일 화요일

블루투스 RFCOMM, read failed. 안드로이드 4.2 이후에서 사용하기

참조 자료 : IOException: read failed, socket might closed - Bluetooth on Android 4.3

java.io.IOException: read failed, socket might closed, read ret: -1
보기만해도 막막한 에러문구다. 블루투스를 PC에서 디버깅할 수도 없고, 핸드폰에 APK를 설치하고 개발자 모드를 키기에는 너무나 귀찮아 검색을 했고, 성과를 얻었다.

public BluetoothSocket createRfcommSocketToServiceRecord(UUID uuid) throws IOException {
        return new BluetoothSocket(BluetoothSocket.TYPE_RFCOMM, -1, true, true, this, -1,
                new ParcelUuid(uuid));
    }
 해당 에러는 createRfcommSocketToServiceRecord 함수로 인해 발생하는데, 생성 시 블루투스 RFCOMM 채널이 어떤 이유에서인지는 모르지만 채널번호가 -1로 설정된다. 

 listenUsingRfcommWithServiceRecord에서 이 함수가 사용된다고 하는데, "The system will assign an unused RFCOMM channel to listen on." 라는 주석이 붙어있다. 예상하기로는 채널로 배정될 수 없는 -1로 초기화하고, 배정 시도 후 배정되지 않은 대상들은 -1로 남아있을 것이니 이로 에러를 캐치하기 위함인 듯 하다는 생각이다. 

 그리고,
public BluetoothSocket createRfcommSocket(int channel) throws IOException {
        return new BluetoothSocket(BluetoothSocket.TYPE_RFCOMM, -1, true, true, this, channel,
                null);
    }
 다른 RFCOMM Socket 생성 함수인 createRfcommSocket은 채널 숫자를 받아서 생성을 한다. 그런데, 어째서 이 함수를 왜 발견하지 못한걸까. 
좀 더 정확한 질문은, 이게 왜 숨겨져 있을까 같다.
 그런 이유에서, 이를 우회하는 방법으로 함수를 사용한다.
mBluetoothSocket = (BluetoothSocket) mBluetoothDevice.getClass().getMethod("createRfcommSocket", new Class[] {int.class}).invoke(mBluetoothDevice,1);
mBluetoothSocket.connect();

2021년 10월 31일 일요일

Labelme 라벨 Crop과 회전 Augmentation

 졸업작품의 데이터셋이 너무 작아 Augmentation을 주어 크기를 키워 훈련 효율을 늘려야 하는 상황에 봉착했다. 또한 나무처럼 정확하게 구간을 정하기 힘든 라벨들이 회귀에 어려움을 주고 있었다.

 우리 프로젝트는 도로 인식이 주 목표이기 때문에 데이터 이미지의 하단부분만 잘라내어 사용하기로 계획을 변경했다. 또한 Augmentation으로 데이터셋을 확장하기 위해 잘라낸 부분을 다시 여러 각도로 돌렸다.

Labelme의 어떤 이미지 파일에 대한 Label JSON 구조는 다음과 같다.

{
  "version": "4.5.9",
  "flags": {},
  "shapes": [
    {
      "label": "_background_",
      "points": [
        [
          200,
          315
        ],
        [
          200,
          400
        ],
        [
          639,
          400
        ],
        [
          639,
          315
        ]
      ],
      "group_id": null,
      "shape_type": "polygon",
      "flags": {}
    }, ...],
  "imagePath": "1_taken-00720.jpg",
  "imageData": "BLOB 데이터",
  "imageHeight": 480,
  "imageWidth": 640
 }
 이미지를 잘라내면서 없어지는 Label들에 대한 처리, 잘라낸 후 남아있는 지점들에 대해 새 이미지 크기에 따라 변하는 Point의 좌표들을 수정해야한다. 우리가 필요로한 부분은 shapes 아래의 labelpoints들이다. Label의 이름은 label로, 그 Label의 각 점은 points에 X, Y 값으로 보관된다. 여기서 유의할 은 Points 들의 시작이 이미지의 좌측 상단부터 시작한다는 점이다.
def crop_process_labelme(path: str, x1: float, y1: float, x2: float, y2: float):
    '''
    path - Directory that contains labelme JSONs
    x1 - the cropping point of left top width from image
    y1 - the cropping point of left top height from image
    x2 - the cropping point of bottom right width from image
    y2 - the cropping point of bottom right height from image
    '''
    
    processed_dir = os.path.join(path, 'processed')
    paths = glob(os.path.join(path, '*.json'))

    if not os.path.exists(processed_dir):
        os.mkdir(processed_dir)

    for path in paths:
        with open(path, 'r') as f:
            print('Processing : ', os.path.basename(path))
            tmp = json.load(f)
            i = 0

            while True:
                try:
                    shape = tmp['shapes'][i]
                    min_x = tmp['imageWidth'] + 1
                    max_x = -1
                    min_y = tmp['imageHeight'] + 1
                    max_y = -1

                    points = shape['points']
                    for point in points:
                        min_x = min(point[0], min_x)
                        max_x = max(point[0], max_x)
                        min_y = min(point[1], min_y)
                        max_y = max(point[1], max_y)

                    left = (x1 - max_x) > 0
                    right = (x2 - min_x) > 0
                    top = (y1 - max_y) > 0
                    bottom = (y2 - min_y) > 0

                    if top and bottom or left and right:
                        # if every points of a shape is out of cutting range,
                        # then it will not appear in a cropped picture. we don't need this.

                        print(tmp['shapes'][i]['label'], max_x, min_x, max_y, min_y)
                        del tmp['shapes'][i]
                    else:
                        print('Cliping : ', i)
                        for point in points:
                            # Clipping points
                            if int(point[0]) >= x2:
                                point[0] = x2
                            if int(point[1]) >= y2:
                                point[1] = y2
                            if int(point[0]) <= x1:
                                point[0] = x1
                            if int(point[1]) <= y1:
                                point[1] = y1
                        i += 1
                except IndexError:
                    break
        with open(os.path.join(processed_dir, os.path.basename(path)), 'w') as f:
            json.dump(tmp, f, indent=2)
 x1, y1, x2, y2는 잘라낼 구간의 좌표 변수이다. shape의 모든 X, Y points의 최대, 최소 값을 구한다. shape의 x, y 최대/최소값이 x1, y1, x2, y2 (잘라낼 구간)에 들어오지 않는다면 해당 shape을 삭제한다. 남은 shapepoints들은 자르고자 하는 범위 내 값으로 Clipping한다.
 Labelme가 제공하는 VOC 데이터셋 생성하는 스크립트는 JSON 안에 있는 이미지 메타데이터(imageData, imageHeight, imageWidth)를 이용하여 Label을 생성한다. 그래서 다음과 같이 원래 이미지의 해상도에서, 자른 구간만이 포함된 label 이미지가 생성된다.

새롭게 나온 Label
 이제 Pillow를 사용해 필요한 부분만을 가져온다. 
def crop_image_voc(path: str, x1: float, y1: float, x2: float, y2: float):
    '''
    path - VOC Dataset root dir that generated by labelme2voc
    x1 - the point of left top width from image
    y1 - the point of left top height from image
    x2 - the point of bottom right width from image
    y2 - the point of bottom right height from image
    '''
    processed_dir = os.path.join(path, 'processed')
    filenames = glob(os.path.join(path, 'SegmentationClassPNG', '*.png'))
    filenames.extend(glob(os.path.join(path, 'JPEGImages', '*.jpg')))
    img = None

    if not os.path.exists(processed_dir):
        os.mkdir(processed_dir)

    for filename in filenames:
        category = os.path.split(os.path.split(filename)[0])[-1]
        if not os.path.exists(os.path.join(processed_dir, category)):
            os.mkdir(os.path.join(processed_dir, category))

        img = Image.open(filename)
        img = img.crop((x1, y1, x2, y2))
        img.save(os.path.join(os.path.join(processed_dir, category), os.path.basename(filename)))
 잘라낸 이미지를 OpenCV로 회전시킨다.
def rotate_images_voc(path: str, angles: list):
    '''
    path - VOC Dataset root dir that generated by labelme2voc
    angles - degrees of image rotation
    '''
    def rotate_image_cv2(image, angle, flag):
        # https://stackoverflow.com/questions/9041681/opencv-python-rotate-image-by-x-degrees-around-specific-point
        
        image_center = tuple(np.array(image.shape[1::-1]) / 2)
        rot_mat = cv2.getRotationMatrix2D(image_center, angle, 1.0)
        result = cv2.warpAffine(image, rot_mat, image.shape[1::-1], flags=flag)
        return result
    
    label_root = os.path.join(path, 'SegmentationClassPNG')
    image_root = os.path.join(path, 'JPEGImages')

    label_processed_dir = os.path.join(label_root, 'processed')
    image_processed_dir = os.path.join(image_root, 'processed')

    if not os.path.exists(label_processed_dir):
    	os.mkdir(label_processed_dir)
    if not os.path.exists(image_processed_dir):
    	os.mkdir(image_processed_dir)

    labels = glob(os.path.join(label_root, '*.png'))
    images = glob(os.path.join(image_root, '*.jpg'))

    for path in labels:
        for a in angles:
            lbl = Image.open(path).convert("P")
            palette = lbl.getpalette()
            lbl = np.array(lbl)
            rotated_lbl = rotate_image_cv2(lbl, a, cv2.INTER_NEAREST)

            new_name = os.path.basename(path).split('.')
            new_name[0] = new_name[0] + '_' + str(a)
            new_name = '.'.join(new_name)

            rotated_lbl = Image.fromarray(rotated_lbl)
            rotated_lbl = rotated_lbl.convert("P")
            rotated_lbl.putpalette(palette)

            rotated_lbl.save(os.path.join(label_processed_dir, new_name))

    for path in images:
        for a in angles:
            img = cv2.imread(path)
            rotated_img = rotate_image_cv2(img, a, cv2.INTER_LINEAR)

            new_name = os.path.basename(path).split('.')
            new_name[0] = new_name[0] + '_' + str(a)
            new_name = '.'.join(new_name)

            cv2.imwrite(os.path.join(image_processed_dir, new_name), rotated_img)
 label_rootimage_root는 스크립트로 생성된 Label 이미지와, 원본 이미지의 위치다.  Palette 데이터가 손실되지 않도록 Interpolation을 Nearest로 선택한다. Label 데이터인 경우 회전 후 저장 시 Labelme에 의해 생성된 Palette 데이터를 복구한 후 저장한다. 
 혹여나 회전하면서 생기는 검은 뒷배경이 나오지 않도록, 회전 후 이미지의 중앙 부분만을 잘라서 저장하는 방법이 필요로 하다면 다음 링크를 참고하면 될 것 같다.

2021년 10월 29일 금요일

Unity MLAPI NetworkVariable 배열 만들기

여러개의 플레이어 ID를 받고 중복되지 않게 그들의 랜덤 팀과 위치를 서버 쪽에서 지정해주려고 NetworkVariable로 저장하려고 했다. Network 변수 타입들을 연속으로 지정하려는데 초기화 시 permission도 줘야해서 작은 클래스를 하나 만들어서 구현했다.
public class NetworkLists<T> : NetworkList<NetworkList<T>>
{
    public NetworkLists(NetworkVariableSettings permission, int length) : base(permission)
    {
        for(int i = 0; i > length; ++i) base.Add(new NetworkList<T>(permission));
    }
}

2021년 10월 27일 수요일

YAML + GStreamer로 Pipeline 만들기

 파이프라인 명령어를 parse_launch로 입력하거나 코드로 작성해 두는 방식들은 수정하기 불편하고, 에러가 눈에 쉽사리 들어오지 않아 시작 Pipeline을 yaml로 수정할 수 있도록 만들어 보았다. Pad 등의 기능은 추가하지 않았다. 비슷한 패턴을 이용하여 구현할 수 있을 것이다. 

YAML 파일은 다음과 같이 작성했다.

element:
  camerasrc:
    element: v4l2src

  srccap:
    element: CAPS
    property: 
        MIME: video/x-raw
        width: 640
        height: 480
        framerate: 30/1
        format: YUY2

  vidconv1:
    element: videoconvert

  vidcap:
    element: CAPS
    property:         
        MIME: video/x-raw
        width: 640
        height: 480
        format: BGRx

  vidconv2:
    element: videoconvert

  timestamp_queue1:
    element: queue
    property:
      leaky: downstream
      max-size-buffers: 1

  timestamp_text:
    element: textoverlay
    property:
      text: ''
      valignment: bottom
      halignment: left
      font-desc: Sans, 12

  timestamp_queue2:
    element: queue
    property:
      leaky: downstream
      max_size_buffers: 1

  app-file-tee:
    element: tee

  appsink_queue:
    element: queue
    property:
      leaky: downstream
      max-size-buffers: 1

  appsink:
    element: appsink
    property:
      max-buffers: 1

  videofilesink_queue:
    element: queue
    property:
      leaky: downstream
      max-size-buffers: 1

  h264encoder:
    element: omxh264enc

  h264cap:
    element: CAPS
    property: 
        MIME: video/x-h264
        stream-format: byte-stream

  h264parse:
    element: h264parse

  tomp4:
    element: mp4mux

  tovideofile:
    element: filesink
    property:
      sync: false
      location: ''

link:
  camerasrc: srccap
  srccap: vidconv1
  vidconv1: vidcap
  vidcap: vidconv2
  vidconv2: timestamp_queue1
  timestamp_queue1: timestamp_text
  timestamp_text: timestamp_queue2
  timestamp_queue2: app-file-tee

  appsink_queue: appsink
  
  videofilesink_queue: h264encoder
  h264encoder: h264cap
  h264cap: h264parse
  h264parse: tomp4
  tomp4: tovideofile

  app-file-tee: [appsink_queue, videofilesink_queue]
 element가 될 요소들은 element 아래에 작성하고, 각 element의 name을 먼저 나오도록 했다. 각 element를 연결하기 위해 element의 이름을 받아 왼쪽에서 오른쪽으로 연결할 수 있게 했다. tee와 같이 여러개를 link하는 요소는 배열로 이름을 받았다.

 CapsFilter를 파싱할때 MIME이라는 예약어를 만들었다. 여기에 Capability의 MIME 종류가 들어간다. 그 외의 Capabilities는 다른 element와 마찬가지로 입력을 받는다.


YAML 파일을 불러들이고, 이를 나누는 함수는 다음과 같이 구현했다.

def set_launch_option(self, path):
    with open(path) as f:
        config = yaml.load(f, Loader=yaml.FullLoader)
        elements = config['element']
        links = config['link']
        super().set_pipe(elements, links)
def set_pipe(self, elements: dict, links: dict):
        add_list = {}
        try:
            for key in elements.keys():
                name = key
                element = elements[key]['element']
                
                if element == 'CAPS':
                    prpty = elements[key]['property']
                    cap_string = ''
                    args = [prpty['MIME'], ]

                    for prpty_key in prpty.keys():
                        args.append(prpty_key + '=' + str(prpty[prpty_key]))
                    cap_string = ", ".join(args)
                    caps = Gst.caps_from_string(cap_string)
                    tmp = Gst.ElementFactory.make("capsfilter", name)
                    tmp.set_property("caps", caps)
                else:
                    try:
                        prpty = elements[key]['property'].items()
                    except:
                        prpty = []
                    tmp = Gst.ElementFactory.make(element, name)
                    for p in prpty:
                        tmp.set_property(p[0], p[1])
                add_list.update({name : tmp})
            
            for key in add_list.keys():
                element = add_list[key]  
                self.pipe.add(element)

            for key in links.keys():
                frm = add_list[key]
                link = links[key]
                if type(link) == list:
                    for lnk in link:
                        frm.link(add_list[lnk])
                else:
                    to = add_list[link]
                    frm.link(to)
        except KeyError as e:
            errmessage = str(getattr(e, 'message', repr(e)))
            logging.error(GStreamerTag('Failed to create a pipeline : Config error', e))
        except Exception as e:
            errmessage = str(getattr(e, 'message', repr(e)))
            logging.error(GStreamerTag('Unknown Error : ', e))
 YAML의 element와 link의 값을 가져온다. 그리고 set_pipe 함수에서 ElementFactory와 link를 통해 Pipeline을 생성한다.

 element로 입력된 요소들을 받아, CAPS일 경우 CapsFilter로 만들어 element로 생성할 수 있도록 처리한다. MIME는 처음에 붙이고, 나머지는 리스트에 담은 후 ', '의 패턴으로 문자열 join하여 caps_from_string 함수에 넣어 Capabilities를 생성한다.

 그 외의 일반 element는 property가 없이 주어진 경우를 따로 구분하여 AttributeError를 피하고, 생성된 element들은 이후 link하기 위해 Dictionary로 저장한다.

 마지막으로 link에서 받은 element의 이름에 따라 각 element들을 연결한다. 여러개로 연결되어야 하는 경우, 배열로 값이 들어오기 때문에 type을 확인한 후 연결될 해당 element에 각각 link한다. 필요하다면 type을 list가 아니라 Iterable로 바꾸어 유연하게 사용할 수도 있을 것이다.

 element나, MIME같은 예약어가 없거나, link에서 알 수 없는 element의 이름이 들어온 경우 등은  KeyError로 Exception이 발생할 것이고, 그 외 어떤 element 생성에 사용할 수 없는 property가 들어온 경우 등의 에러는 마지막 Exception으로 게으르게 처리했다.

2021년 9월 21일 화요일

docker-compose시 ARG에 빈 값이 넘어오던 문제

졸업 작품을 준비하면서 L4T-Tensorflow에 추가적으로 내 프로젝트가 제공하는 파일과 기타 필요로한 설치를 한꺼번에 할 수 있도록 Dockerfile과 docker-compose.yml을 이용하기로 했다.

내 처음 도커파일은 다음과 같다
# 1. l4t-tensorflow의 이미지를 가져온 다음 base 이미지로 명칭 설정, 시스템 업데이트를 수행
# 2. 현재 docker-compose를 실행한 위치 (복제한 리포지토리 위치)의 내용을 모두 새로 생성될 
#    도커 이미지로 복사 
# 3. Python에서 GStreamer 사용하는데 필요한 기타 파일들을 받는다.
# 4. 이후에 두개의 branch로 나눈다. 하나는 디버그용 그리고 디버그가 아닌 이미지
# 5. 모든 branch를 위한 이미지가 생성되면 DEBUG의 값을 참조하여 요청된 이미지를 
#    최종 이미지로 선정하고 docker-compose에 따라 이미지를 꾸며준다. 
ARG DEBUG

FROM nvcr.io/nvidia/l4t-tensorflow:r32.5.0-tf2.3-py3 AS base

RUN apt-get update
RUN apt-get purge -y gnome* ubuntu-desktop
RUN apt-get autoremove
RUN apt-get clean
RUN apt-get upgrade -y

ENV DIR=/root/sopoware-panoptes
RUN mkdir $DIR
WORKDIR ${DIR}
COPY ./ ./
RUN chmod +x ./start.sh

RUN apt-get install -y gstreamer1.0-tools gstreamer1.0-alsa gstreamer1.0-plugins-base gstreamer1.0-plugins-good gstreamer1.0-plugins-bad gstreamer1.0-plugins-ugly gstreamer1.0-libav
RUN apt-get install -y libgstreamer1.0-dev libgstreamer-plugins-base1.0-dev libgstreamer-plugins-good1.0-dev libgstreamer-plugins-bad1.0-dev;
RUN apt-get install -y python3-gi python3-gst-1.0

FROM base AS RUNTYPE-1
RUN echo "Building Debug mode..."
RUN apt-get install -y lighttpd iptables
# iptables setting. TODO
RUN service lighttpd start
RUN cp ./demo/index.html /var/www/html/index.lighttpd.html

FROM base AS RUNTYPE-0
RUN echo "Building Batch mode..."

FROM RUNTYPE-${DEBUG} AS final
ENTRYPOINT $DIR/start.sh
FROM에서 AS에 사용한 이미지 이름에 대문자를 사용해서 오류가 발생했고, 이후에는 알수없는 invalid reference format이라는 에러를 계속해서 받았다. 이유를 찾기 위해 DEBUG 값 (빌드 명령인자로 받기로 설정한 값)을 echo로 꺼내보니 비어있는 것을 확인했다.

FROM 이전에 있는 ARG는 DEBUG 인자의 값을 받아왔지만 문제는 base 이미지를 만들때 해당 ARG가 설정되지 않는다는 것이다. 그래서 ARG를 base의 안쪽으로 옮기고 확인해보니 값이 정상적으로 넘어왔다. 하지만, 마지막 FROM에서 해당 ARG 값을 받아오자 다시 빈 값이 넘어오는 것이다. 그래서 처음에 ARG를 선언하고, 다시 base 이미지를 생성할때 ARG를 한번 더 설정하니 다음부터 모든 ARG DEBUG의 값이 정상적으로 들어가기 시작했다.

[번] Callback 지옥, Promises, 그리고 Async/Await

원문:  https://blog.avenuecode.com/callback-hell-promises-and-async/await  Callbacks와 promises, 그리고 async/await을 쓰는 비동기 자바스크립트는 반환하는데 시간이 소요되는...